Coincidentally, on the day after I started reading Super Mario, by Jeff Ryan (link), I received a package of three SNES games from Japan (ordered for me on eBay by my older brother). These games include Super Mario Kart, which was my favorite game back in the day.
Here's the problem: it turns out that Japanese SNES games (technically Super Famicon games) don't fit into American Super Nintendo game systems; there are a couple of tabs inside that match channels on the SNES cartridges, which the Japanese versions don't have.
 |
| Channels on SNES (top) are absent in Super Famicon cartridge (bottom) |
A quick search yielded many instructions on how to disassemble the Super Nintendo and remove the tabs (like this: link), but I didn't want to possibly mess up my treasured game system from high school! Instead, I decided to experiment on the Japanese Super Famicon cartridges. Spoiler: it worked!
Materials needed:
- Super Famicon game cartridge
- SNES game cartridge (as reference)
- Sharpie marker
- Drill with 3/16" bit
- Diagonal pliers (wire cutters)
- Round file (approx. 3/16")
How to Play Japanese Super Famicon Games on Super Nintendo (SNES)
- Use a Sharpie marker to mark where the channels should be on the Super Famicon cartridge, using the Super Nintendo (SNES) cartridge as a guide.
NOTE: The Super Famicon cartridge has an existing hole inside the marked area. This will be useful in step three.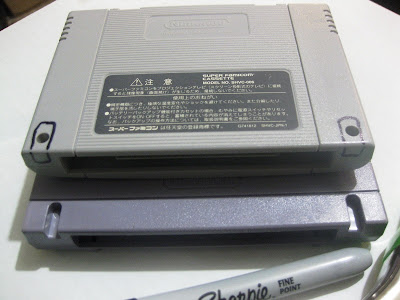
Marked Super Famicon cartridge on top of SNES cartridge - Use a drill with a 3/16" drill bit to drill holes from the bottom of the Super Famicon cartridge to the depth of the SNES channel.
In other words, hold the Super Famicon cartridge upside down on a workbench and drill a hole in the cartridge plastic, not going much deeper than the SNES channel does.
Drill holes in the marked spots from previous step. - Use diagonal pliers to snip the thin plastic between the hole just drilled and the hole that existed in the Super Famicon cartridge.
NOTE: Don't worry if it looks ugly right now, we'll clean it up in a later step.
Diagonal pliers (cutters) clear away the plastic

It's ugly right now, but it will get cleaned up later. - Use the drill and bit to carefully continue the channel so it's as long as on the SNES.

The drill and bit are used to make the channel longer - Use a round file (approx. 3/16") to clear out and clean up channels on both sides.

File used to clean up channels - Enjoy your Super Famicon cartridges in your SNES (without having to damage the SNES!)

Super Famicon Cartridge fits perfectly in SNES

Characters at top read (in Katakana): Mario Ka-to
(Sorry for the picture-of-a-TV black line)

This says: 1 Pureiya- Ge-mu

My quick test run (as the turtle) shows more Japanese characters!


0 thoughts
Post a Comment